Introduction
Search is more than ever a commodity. Not only can we use great open source solutions such as Apache SOLR or ElasticSearch to index collections of documents, but we can also let others take care of the management of the software and resources and treat search as a service. Amazon provide such a functionality with CloudSearch, their SOLR-based search service.
In this tutorial, I will show how to index the content of web sites into AWS CloudSearch using two open source web crawlers : Apache Nutch and StormCrawler. We will go through a very simple, single site setup to get familiar with these projects and understand how they differ from each other. As an example of how a company could crawl its own website, we will crawl http://www.tescobank.com/. It will be relatively easy to adapt the resources for your own needs should you need to.
This is merely an introduction to Nutch, StormCrawler and web crawling in general. Please refer to their respective documentations for more details. The instructions you will find below are based on Linux command lines and tools.
NOTE : STORMCRAWLER HAS EVOLVED A LOT SINCE THIS POST WAS ORIGINALLY PUBLISHED - HAVE A LOOK AT THIS POST FOR A MORE UP TO DATE WAY OF BOOTSTRAPPING THE PROJECT.
Apache Nutch
Presentation
Apache Nutch is a popular open source web crawler which has been around for over a decade. Nutch was originally designed by Doug Cutting (who also created Apache Lucene) and Mike Cafarella. The project has a special place in the history of Big Data as Apache Hadoop (see History of Hadoop) among other things was borne out of it. The project is still active and is used by many companies and researchers.
There are several open source crawlers available, however Nutch is one of the very few which can handle data at very large scale (thanks to Hadoop). Some of our customers have used it for multi-billion pages web crawls, as does the CommonCrawl project. However, a survey of Nutch users conducted some time ago found that most users run it on a single machine (and less than a million URL) just as we will do in this tutorial. Nutch is an attractive proposition not only because of its scalability but also for smaller crawls because of the features it offers and the fact that it can be customised via a plugins.
Since Nutch is based on Hadoop, it operates as a sequence of batch jobs implemented with MapReduce with the data being stored on HDFS. This makes the crawler robust and fault tolerant. Moreover, Nutch can run on platforms such as ElasticMapReduce straight out of the box as explained on this video tutorial.
Apache Nutch comes in two flavours : 1.x and 2.x. The latter leverages a storage abstraction layer named Apache GORA which allows to store the data in NoSQL databases such as HBase or Cassandra whereas the former uses standard Hadoop data structures on HDFS. This tutorial is based on Nutch 1.11 which contains a plugin for CloudSearch (see https://issues.apache.org/jira/browse/NUTCH-1517).
Nutch is complex and feature-rich. Again, this tutorial is just an introduction: please refer to the documentation for more details.
Prerequisites
The instructions below are based on a Linux distribution. You will need to install the following softwares :
Installation
`ant clean runtime`
if the command runs successfully, you should find that a new directory ‘runtime’ has been created in $NUTCH_HOME, which contains two subdirectories local and deploy. The latter is used when running on a Hadoop cluster or in pseudo-distributed mode and contains only a large jar file with all the classes, configuration files and dependencies as well as the shell scripts for running the crawls. As we are running in local mode for this tutorial, we will use the former i.e. runtime/local.
CloudSearch setup
Before launching the Nutch crawl, we need to define a domain for CloudSearch. We can use the script provided in the CloudSearch plugin :
`chmod a+x $NUTCH_HOME/src/plugin/indexer-cloudsearch/createCSDomain.sh`
`$NUTCH_HOME/src/plugin/indexer-cloudsearch/createCSDomain.sh nutch-tescobank`
You can then use the AWS console [https://aws.amazon.com/cloudsearch/] to check that the domain has been successfully created. If it has not, please check that you configured your credentials correctly.
The domain should become available after some time. Please take note of the value of the Document Endpoint which you will need to specify in the configuration below.
This script above has created a number of fields for indexing the documents crawled with Nutch into CloudSearch. Here is how the CloudSearch console displays the indexing options:
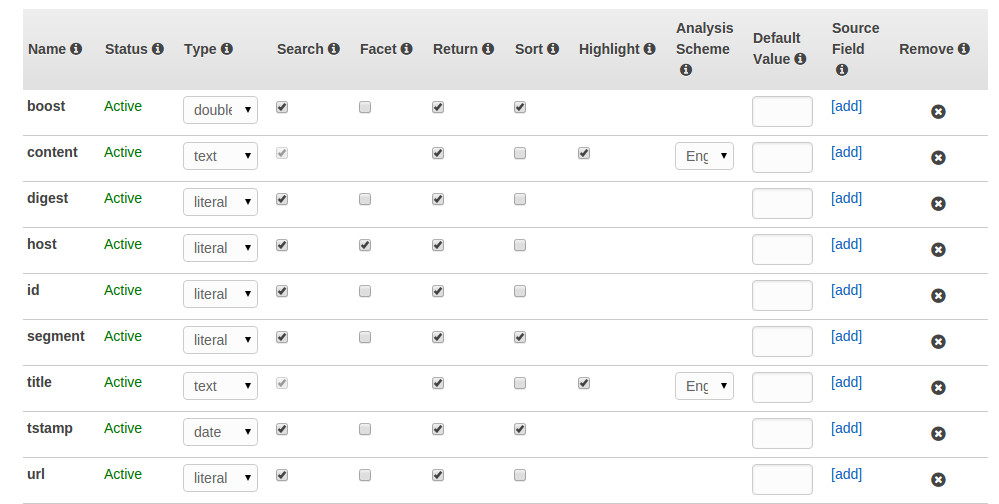 |
| CloudSearch indexing options for Nutch |
These fields can of course be modified to suit the needs of your crawl. Please note that the CloudSearch plugin first retrieves the list of fields that are defined for a domain and will ignore any field in the Nutch documents at indexing time if they are not defined in the domain.
Nutch Configuration
Nutch is configured by a set of files located in the conf directory. The main file is nutch-site.xml. Do not edit nutch-default.xml : as its name suggests, it defines the default values for the configuration and it is good practice to leave this file as-is and simply use nutch-site.xml which overrides it.
Please edit the file $NUTCH_HOME/runtime/local/conf/nutch-site.xml with the following content :
<?xml version="1.0"?>
<?xml-stylesheet type="text/xsl" href="configuration.xsl"?>
<!-- Put site-specific property overrides in this file. -->
<configuration>
<property>
<name>http.agent.name</name>
<value>TescoBankCrawler</value>
</property>
<property>
<name>http.agent.email</name>
<value>crawler@mycompany.com</value>
</property>
<property>
<name>fetcher.server.delay</name>
<value>2.0</value>
</property>
<property>
<name>http.content.limit</name>
<value>-1</value>
</property>
<property>
<name>db.max.outlinks.per.page</name>
<value>-1</value>
</property>
<property>
<name>db.ignore.external.links</name>
<value>true</value>
</property>
<property>
<name>plugin.includes</name>
<value>protocol-http|urlfilter-regex|parse-(html|tika)|index-basic|indexer-cloudsearch|scoring-depth|urlnormalizer-(pass|regex|basic)</value>
</property>
<property>
<name>cloudsearch.region</name>
<value>ENTER.REGION.HERE</value>
</property>
<property>
<name>cloudsearch.endpoint</name>
<value>ENTER.ENDPOINT.HERE</value>
</property>
<property>
<name>cloudsearch.batch.maxSize</name>
<value>100</value>
</property>
</configuration>
|
These properties are fairly straightforward: you can find a description of what they do in nutch-default.xml as well as additional ones.
http.agent.* : defines how the crawler identifies itself in the http headers. It is mandatory to specify these and will allow webmasters to identify your crawler in their logs.
fetcher.server.delay : determines how frequently the fetcher will send requests to a given host. We will be using a value of 2 seconds between requests.
http.content.limit : we do not want to trim the content of the documents and set -1 to that effect.
db.max.outlinks.per.page : we do not want to limit the number of outlinks found in the pages.
db.ignore.external.links : setting the value to true will guarantee that the crawl stays within the same hostname as the seed URLs, in our case tescobank.com. This is a simple way of controlling the expansion of the crawl.
plugin.includes : lists the plugins to use for the crawl, in particular this is where we want to specify that we will use the cloudsearch plugin for indexing (indexer-cloudsearch).
cloudsearch.* : this is where we define the domain endpoint and region.
cloudsearch.batch.maxSize : maximum number of documents to send as a batch to CloudSearch.
URL filtering and normalization
We have already restricted the scope of the crawl with the db.ignore.external.links parameter. We will now go further and will also edit the URL filters to prevent https URLs to be crawled. This is done by editing the file conf/regex-urlfilters.txt and adding https to the first regular expression and commenting out the third regexp as shown below.
# skip file: ftp: and mailto: urls
-^(file|ftp|mailto|https):
# skip image and other suffixes we can't yet parse
# for a more extensive coverage use the urlfilter-suffix plugin
-\.(gif|GIF|jpg|JPG|png|PNG|ico|ICO|css|CSS|sit|SIT|eps|EPS|wmf|WMF|zip|ZIP|
ppt|PPT|mpg|MPG|xls|XLS|gz|GZ|rpm|RPM|tgz|TGZ|mov|MOV|exe|EXE|jpeg|JPEG|
bmp|BMP|js|JS)$
# skip URLs containing certain characters as probable queries, etc.
# -[?*!@=]
# skip URLs with slash-delimited segment that repeats 3+ times, to break loops
-.*(/[^/]+)/[^/]+\1/[^/]+\1/
# accept anything else
+.
|
We will also add a normalisation rule so that any parameters in a URL would get removed. We do that by adding the following snippet to regex-normalize.xml :
<!-- removes parameters from URL -->
<regex>
<pattern>\?.+</pattern>
<substitution></substitution>
</regex>
|
Doing so will optimise the crawl process by avoiding to fetch duplicate URLs e.g.
and
would both be normalised to single URL
It would also prevent .css or .js URLs to be included as the regular expression in the url filter file above would not match if these URLs has a query part.
Of course normalising the URLs in this way is not necessarily the right thing to do for all the crawls. It just happens to be useful for this particular web site (and is also a good way of introducing URL normalisation).
Running the crawl
We need to give a crawler somewhere to start. Let’s create a directory where the output of the crawl will be stored with :
`mkdir ~/tescobank`
and create a seed file with
A seed file is simply a list of URLs to use as starting points for the crawl. In our case we will use the root URL of the TescoBank website.
We can now move to ‘runtime/local/bin’ and use the shell scripts. The script ‘nutch’ allows to run individual operations and steps whereas `crawl` combines these individual operations for a standard crawl run. You can of course modify its content to remove or add specific steps.
Let’s first check that we got the configuration right. The command
should return something similar to this :
fetching: http://www.tescobank.com
robots.txt whitelist not configured.
parsing: http://www.tescobank.com
contentType: application/xhtml+xml
tstamp : Thu Aug 27 11:39:39 BST 2015
digest : e267f9dd6bfcf0a6ae27f2848ae5016d
host : www.tescobank.com
id : http://www.tescobank.com
title : Tesco Bank - Personal Finance - Banking and Insurance
url : http://www.tescobank.com
content : Tesco Bank - Personal Finance - Banking and Insurance skip to content Our website works better with
|
What this command does is that it simulates the crawl process on a single URL which is useful for checking the configuration and metadata extraction. This is the equivalent of calling the fetch, parse and index steps on a URL. The output is a list of named fields (contentType, tstamp etc...) which will be sent to CloudSearch as a representation of the document.
You have probably recognised the field names we created in the cloudsearch domain. There are actually two more fields (boost, segment) which are generated by the crawl steps and not by the indexchecker command.
We are now ready to run the crawl. We could call the individual steps one by one but it is far easier to use the all-in-one crawl script e.g.
./crawl --index ~/tescobank/seed ~/tescobank -1
where we indicate that we want to index the documents and use the seed file created earlier. The output will be located in ~/tescobank/. The last parameter is the number of rounds of crawling, a value of -1 will simply keep iterating on the generate-fetch-parse-update steps until there aren’t any URL eligible for fetching left.
The console will display the individual Nutch commands as well as the logs. You can inspect the log files in runtime/local/logs/hadoop.log for debugging. Once the crawl is complete, you should be able to query and retrieve documents from CloudSearch.
The monitoring section for the CloudSearch UI should look like the picture below, where I added the beginning and end of each crawl iteration.
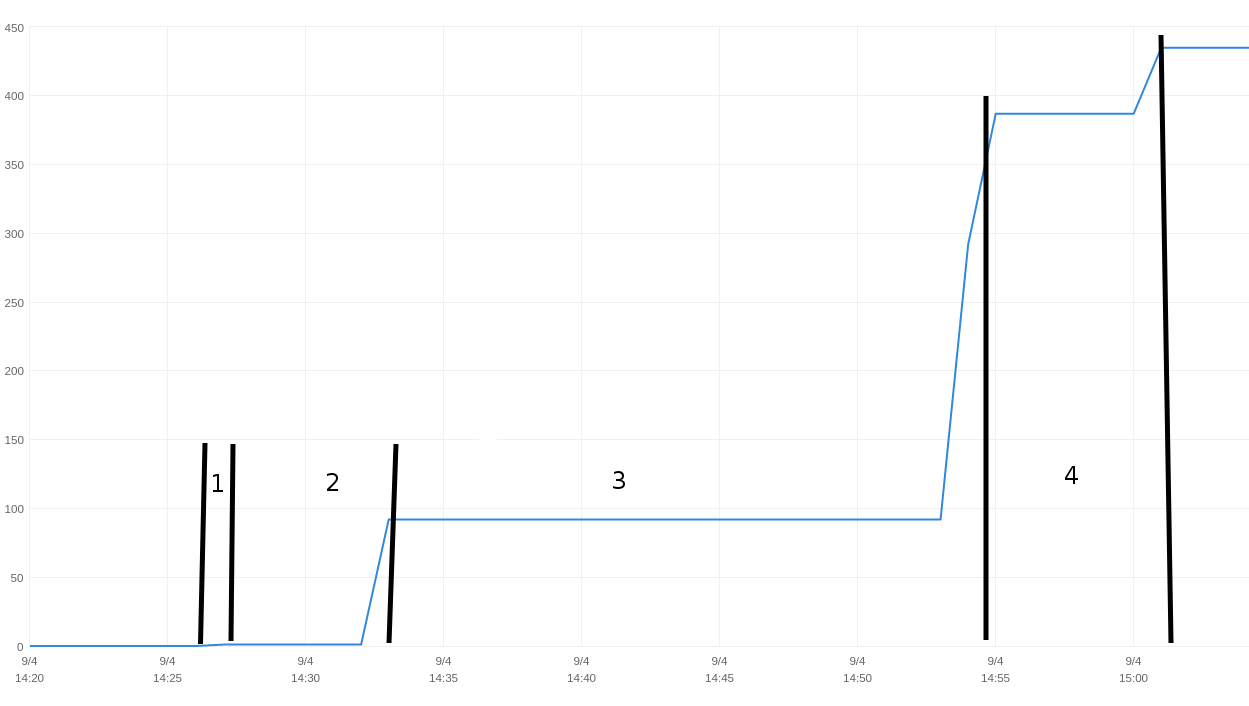 |
| Timeline of Nutch indexing |
Output description
If you now have a look at the content of the ~/tescobank directory which we gave as parameter to the crawl script, you should see something similar to this :
├── crawldb
├── linkdb
├── seed
└── segments
├── 20150904152610
├── 20150904152646
├── 20150904153259
└── 20150904155447
The seed file is the one we created earlier and contains the URLs to use as starting point for the crawl. The linkdb directory can be ignored for the purpose of this tutorial. It is a data structure containing the relations between URLs which can be used to index the anchor text of the links pointing to a given URL. By default links within the same host are ignored, which is why this structure is empty.
The crawldb directory should contain a current/part-00000. The name of this file is probably puzzling but bear in mind that Nutch runs on Hadoop with the data stored in a distributed fashion on HDFS. Roughly speaking each distributed task will generate a part of the data, this part would then be replicated across the HDFS data nodes.
The crawldb is a key data structure of Nutch. It contains all the information we have about a webpage, such as its URL, metadata, status, when it is next due for fetching etc… Since the content of the file is a serialisation of the Java objects in a Hadoop datastructure (call a SequenceFile) you can’t read these files directly. Instead Nutch provides a number of tools for displaying the content of these files.
The most commonly used one is readdb :
URL: http://www.tescobank.com/security/index.html
Version: 7
Status: 2 (db_fetched)
Fetch time: Sun Oct 04 15:30:42 BST 2015
Modified time: Thu Jan 01 01:00:00 GMT 1970
Retries since fetch: 0
Retry interval: 2592000 seconds (30 days)
Score: 0.0
Signature: c7eb5707561c7c498020d3b553df19f2
Metadata:
_depth_=2
_pst_=success(1), lastModified=0
_rs_=1761
Content-Type=application/xhtml+xml
_maxdepth_=1000
This particular command displays the content of a particular entry in the crawldb. The same readdb command can also be used to get statistics about the crawldb :
./nutch readdb ~/tescobank/crawldb/ -stats
CrawlDb statistics start: /home/pebble/tescobank/crawldb/
Statistics for CrawlDb: /home/pebble/tescobank/crawldb/
TOTAL urls: 504
retry 0: 503
retry 1: 1
min score: 0.0
avg score: 0.001984127
max score: 1.0
status 1 (db_unfetched): 1
status 2 (db_fetched): 430
status 3 (db_gone): 16
status 4 (db_redir_temp): 2
status 5 (db_redir_perm): 50
status 7 (db_duplicate): 5
CrawlDb statistics: done
Finally we can also dump the whole content of the crawlDB into a text file for further examination:
./nutch readdb ~/tescobank/crawldb/ -dump /tmp/dumpCrawl
As we saw previously, the crawl directory also contains a number of segment directories with the following subdirectories :
~/tescobank/segments/20150904152610/content/
~/tescobank/segments/20150904152610/crawl_fetch/
~/tescobank/segments/20150904152610/crawl_generate/
~/tescobank/segments/20150904152610/crawl_parse/
~/tescobank/segments/20150904152610/parse_data/
~/tescobank/segments/20150904152610/parse_text/
Again, all these contain part-* files. The content of a segment can be explored with the command ‘./nutch readseg’. A segment contains the data for a round of fetching, these subdirectories are generated by the various steps as we will see right now.
How Nutch works - step by step
As we mentioned previously, Nutch crawls in sequence of batch steps. Each of these steps can be ran manually using the nutch script but the crawl script simply combines these commands for you in a convenient fashion.
First there is an injection step. This takes the seed file as input and creates (or updates) a crawldb directory. We then do a number of rounds where we generate a segment by selecting from the crawldb the URLs which are eligible for fetching; this populates the crawl_generate subdirectory of the segment. We then fetch the content which creates the crawl_fetch and content subdirectories, then parse the fetched content. This extract the text of the webpages, some metadata and often discovers links to potentially new web pages. The following step is to update the crawldb with these newly discovered URLs as well as update the information we have about the URLs we just fetched.
There are other steps involved in a round of fetching, such as the link inversion (to produce the linkDB), deduplication and of course the indexing, where we sent the documents to CloudSearch.
The crawl script keeps generating new segments until no URLs are eligible for fetching, in which case it returns.
Going distributed
As mentioned earlier, Nutch has a rich set of features and there are many ways in which you could take it further when you start experimenting with your own crawls. One possible thing would be to create additional search fields and populate them from metadata extracted from the documents, see [https://wiki.apache.org/nutch/IndexMetatags] for pointers on how to achieve that.
As your crawls will get larger or if you start running Nutch in production, you will certainly need to run it in pseudo (or fully) distributed mode. What this means is that instead of running in local mode, the Nutch jobs will be deployed to a Hadoop cluster either consisting of a single machine running all the services (pseudo-distributed) or several ones.
There are multiple benefits to doing this, mainly that the larger jobs will be split into tasks running in parallel. It will also be easier to check the logs as they will be organised per job and task and you will also get interesting insights into the behaviour of your crawls with the counters available for each job. Finally, it will also make the way Nutch works more explicit and you should gain a better understanding of how the various batch jobs articulate.
Hopefully I have convinced you to give the pseudo-distributed mode a try. Here are the steps to follow for doing this.
Download Hadoop 2.4.1 which is the version used by Nutch as of writing from
We then need to add the Hadoop commands to the path with :
export PATH=$PATH:/usr/local/bin/hadoop-2.4.1/bin
Now let’s see how to run Nutch. First we’ll copy the seed file we created earlier to HDFS with
hadoop fs -mkdir /tescobank
hadoop fs -copyFromLocal ~/tescobank/seed /tescobank
we can then check the content of that file on HDFS with :
hadoop fs -text /tescobank/seed
Let’s edit the content of the files nutch-site.xml, regex-urlfilters.txt and regex-normalize.xml as we did previously but this time we do so in $NUTCH_HOME/conf/ and not in runtime/local/conf. The reason for this is that in deployed mode we have to generate a job archive containing all the classes, resource files and dependencies with the command ‘ant clean runtime’.
If you are feeling curious, you could have a peek at the content of the job file you just generated in runtime/deploy/apache-nutch-1.11-SNAPSHOT.job.
Now let’s go to the directory runtime/deploy, as you see it contains only the job archive and the script we already used in /bin.
We can start the crawl with
runtime/deploy/bin/crawl --index /tescobank/seed /tescobank -1
Please note that the paths are different from when we ran in local mode and point to the locations on HDFS.
The console will display various logs as the crawl progresses but you should now be able to see the job information on http://localhost:8088/ as shown below.
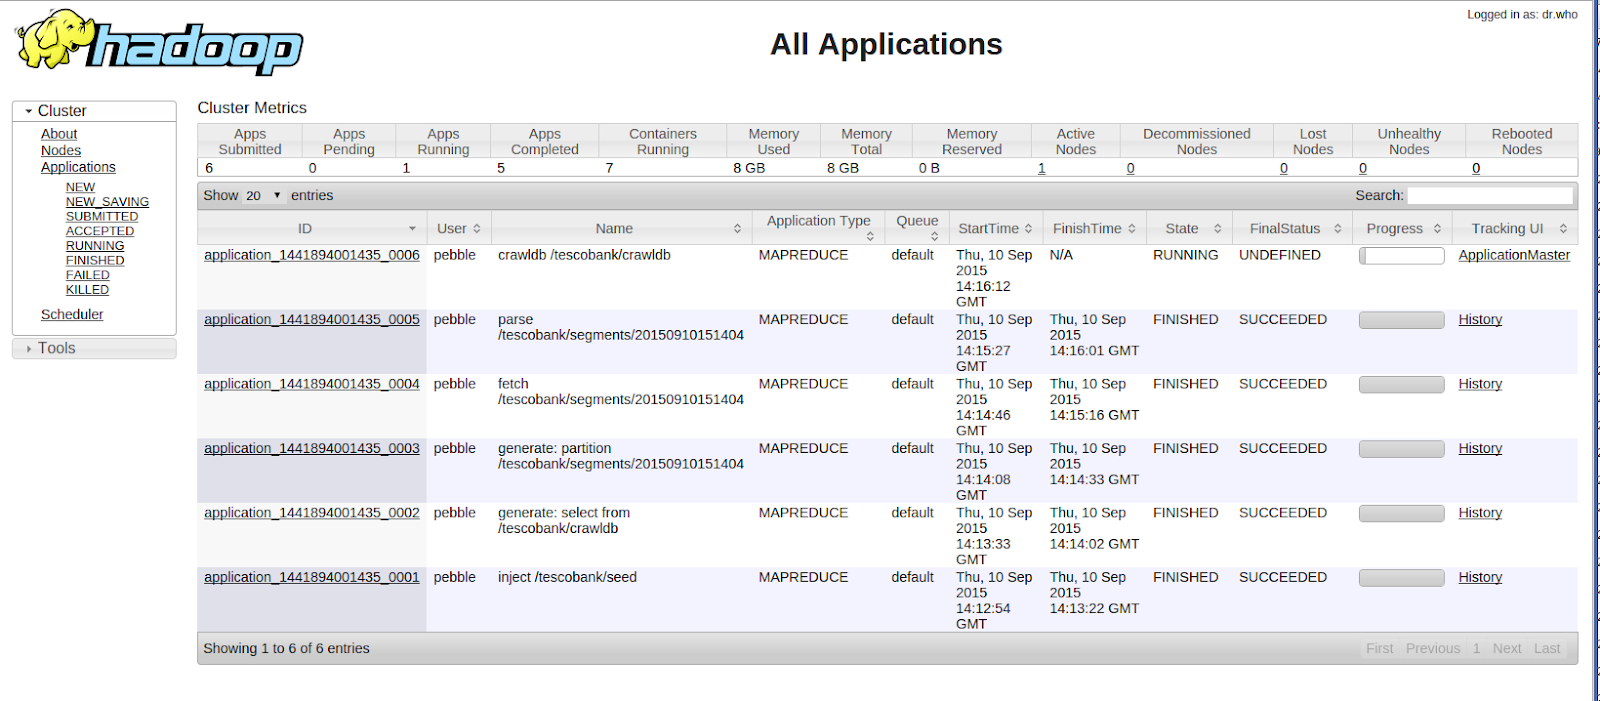 |
| Hadoop application UI |
Each individual job can be displayed, as we can see here with a fetch task, where the status gets constantly updated and provides useful clues on the behaviour of the crawler.
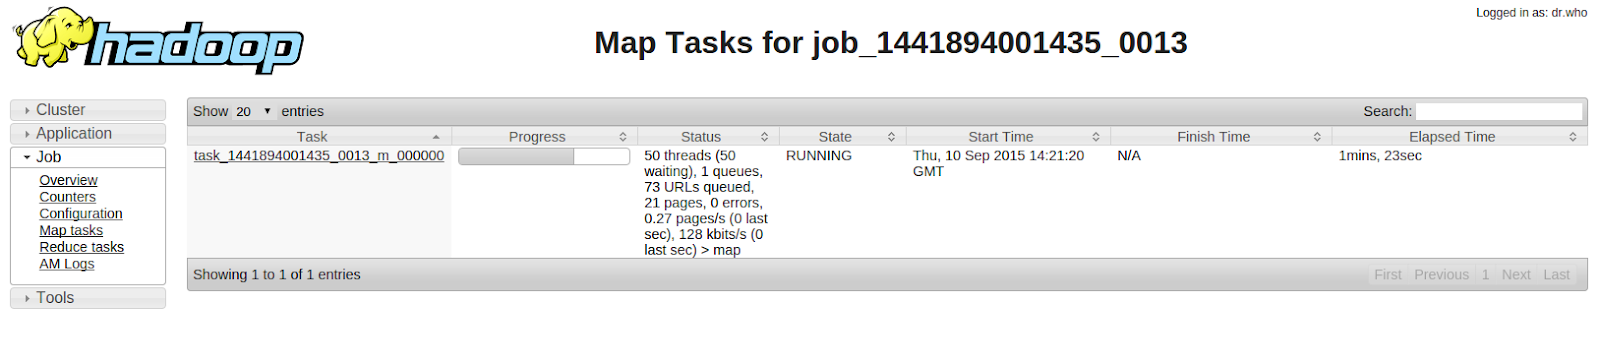 |
| Hadoop Job UI |
You can also get the logs for a particular job and its counters, as shown below.
 |
| Job counters |
Running in distributed mode adds some overhead compared to using Nutch in local mode, however the benefits it provides largely outweighs the drawbacks.
Now that we have seen how to install, configure and run Apache Nutch in both local and distributed mode, let’s see how we can achieve the same goals using StormCrawler.
StormCrawler
Presentation
StormCrawler (https://github.com/DigitalPebble/storm-crawler) is an open source project under Apache License which provides a collection of resources for building scalable, low-latency web crawlers running on Apache Storm. It is often described as a SDK and it requires some minimal programming as we will see below.
Unlike Hadoop which is batch-driven, Storm is a real-time stream processing platform which has become very popular in recent years. It is both scalable and reliable and is based on simple yet powerful concepts. Put it simply, a Storm pipeline is called a topology. A topology is a graph of spouts and bolts that are connected with stream groupings. Spouts emit the tuples in the first place, while bolts process them.
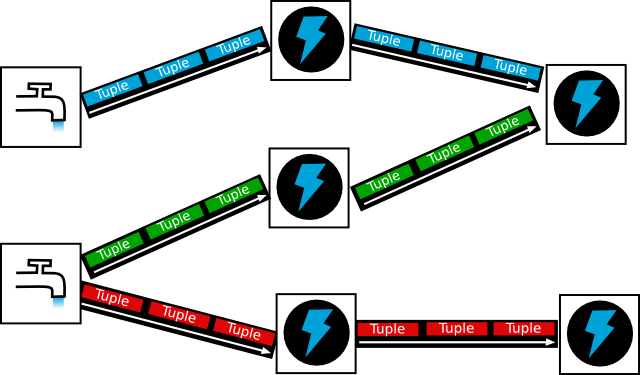 |
| Storm concepts : spouts, streams, bolts and tuples |
What StormCrawler provides is a set of spouts and bolts that can be combined to build a web crawler, as well as various utilities and resources as we will see below. The project is very modular and distinguishes between the core components (which any StormCrawler topology would need) and external modules, such as the AWS module containing a bolt for indexing with CloudSearch or the SQL one which we will use in this tutorial.
One of the main differences between Hadoop and Storm is that a Storm topology runs continuously whereas a MapReduce job runs only for the time it takes to process its input. Unlike Nutch which does things with separate batch steps as we’ve seen previously, StormCrawler does everything i.e. fetching, parsing, indexing etc… at the same time.
Now let’s see how to set it up to crawl the TescoBank website.
Prerequisites
The instructions below are based on a Linux distribution. You will need to install the following softwares :
You will need an AWS account and configure the credentials as you did for the Nutch tutorial.
Installation
MySQL
Unlike Nutch which relies on Hadoop data structures stored on HDFS, StormCrawler connects to external data sources. Depending on the use case, these data sources will be queues (like AWS SQS or RabbitMQ) or databases. For this tutorial we will use a MySQL table to store the status of the URL, in a similar fashion to the crawldb in Nutch (see above).
After you’ve installed Mysql, you can create a database and a user then define a table that will be used by our topology :
CREATE DATABASE crawl;
CREATE USER 'tesco'@'localhost' IDENTIFIED BY 'bank';
GRANT ALL PRIVILEGES ON crawl.tescobank TO 'tesco'@'localhost' IDENTIFIED BY PASSWORD 'bank' WITH GRANT OPTION;
FLUSH PRIVILEGES;
CREATE TABLE tescobank (
url VARCHAR(512),
status VARCHAR(16) DEFAULT 'DISCOVERED',
nextfetchdate TIMESTAMP DEFAULT CURRENT_TIMESTAMP,
metadata TEXT,
bucket SMALLINT DEFAULT 0,
PRIMARY KEY(url)
);
CloudSearch
The Tescobank repository contains a script (createCSDomain.sh) for creating a CloudSearch domain. As with the Nutch tutorial, please run this script and take note of the value of the Document Endpoint so that you can configure the StormCrawler topology to index documents to it.
Once the domain is created, you should see the fields below :
 |
| CloudSearch indexing for StormCrawler |
StormCrawler
The resources required by this tutorial (SQL, CloudSearch) are in the version 0.6 of StormCrawler which was released on 3rd Sept 2015. These dependencies are declared in the pom file located in the tescobank repository.
We need to write the resources for building a web crawler with StormCrawler. Thanks to StormCrawler’s modular nature, this means having :
a Java class extending ConfigurableTopology : this will specify which components to put together for building the crawl
a YAML configuration file : used by ConfigurableTopology to build a configuration object from a file
a set of resources : URLFilters, ParseFilters and their configurations
a pom file for building with Maven and declaring the dependencies
We will use Maven to build a Jar file containing the Java class, the dependencies and resource files. Unlike Nutch, there is no need to download and compile the entire source code. Everything is managed as Maven dependencies and we can just focus on the custom parts of the crawler. This also makes it easier to upgrade the versions of StormCrawler, whereas with Nutch you would have to merge the changes from the Nutch release back into your codebase.
Description of the pipeline
Our crawl topology combines components from various modules :
core : URLPartitionerBolt, SimpleFetcherBolt, SiteMapParserBolt and StatusStreamBolt
tika : ParserBolt
cloudsearch : CloudSearchIndexerBolt
sql : SQLSpout and StatusUpdaterBolt
Our topology is quite straightforward. The SQLSpout pulls the URLs due for fetching from the MySQL table and passes them to the URLPartitionerBolt, which creates a new key field based on the hostname of the URL and uses it to distribute the tuples to the SimpleFetcherBolt. The latter fetches the content of the URLs and sends tuples to the SiteMapParserBolt. If the content is not a Sitemap file then the tuple is simply transferred to the ParserBolt. The parser bolt extracts text and metadata from the binary content. Later on the CloudSearchIndexerBolt sends documents to index to CloudSearch.
As you have probably noticed our topology uses two types of streams : the default one for handling the content of a URL (fetching / parsing / indexing) and another one called status which is used to communicate with the external storage (our MySQL table) and update or create information about the URLs. You can find more information about status streams on the corresponding WIKI page. The StatusUpdaterBolt is the final piece of the jigsaw and sends updates about the URL status to the SQL table, like for instance creating a new row for a newly discovered URL or changing the value of the nextfetchdate field based on the status of the URL (e.g. DISCOVERED, FETCHED etc...).
Note : the URLPartitionerBolt is not really needed for this particular use case as the crawl is limited to a single host, we could have connected the SimpleFetcherBolt straight into the SQLSpout. I chose to include it to show how it can be used for larger crawls as URLs from the same host or domain need to be directed to the same instance of the FetcherBolt so that it can enforce politeness.
Configuration
The file crawler-conf.yaml contains the configuration of the StormCrawler components. This is where you will need to specify the value of cloudsearch.endpoint in particular. The WIKI contains a page describing the common configuration elements.
Some of the key values will look familiar like the agent name ones, their semantic is the same as in Nutch. You should not need to modify any other values for the crawl topology to work.
Custom resources
Just as we did for Nutch, we need to control the expansion of our crawl. This is done with the file src/main/resources/tesco.urlfilters.json which declares the order in which the filters must be used and how they should be configured. One important difference between Nutch and StormCrawler is that the former distinguishes between filters and normalisers whereas the latter merges both concepts into a single one. This is a lot more flexible in practice as it gives more control on how the various steps can be combined. There are two different resources for the regex-based filtering and normalisation though (RegexURLNormalizer and RegexURLFilter), whose format is exactly the same as in Nutch, however from a conceptual point of view both are implementations of URLFilter.
All the resources defined in the urlfilters.json file should be easy to understand, except maybe from RobotsFilter which has no equivalent in Nutch. It simply loads the robots directive in memory and applies them as a filter, which is far more efficient than adding them to the crawldb in Nutch only to discard them at fetch time!
URLFilters are used by the FetchBolt when dealing with redirections and both the ParserBolt and SitemapParserBolt to discard newly discovered URLs.
Another important file is src/main/resources/tesco.parsefilters.json which lists the ParseFilters to be applied during the parsing step. This is typically used to scrape information from webpages, in our case it is pretty straightforward :
{
"com.digitalpebble.storm.crawler.parse.ParseFilters": [
{
"class": "com.digitalpebble.storm.crawler.parse.filter.XPathFilter",
"name": "XPathFilter",
"params": {
"canonical": "//*[@rel=\"canonical\"]/@href",
"description": [
"//*[@name=\"description\"]/@content",
"//*[@name=\"Description\"]/@content"
]
}
},
{
"class": "com.digitalpebble.storm.crawler.parse.filter.ContentFilter",
"name": "ContentFilter",
"params": {
"pattern": "//DIV[@id=\"maincontent\"]"
}
}
]
}
We simply use XpathFilter to extract the values of the canonical and description tags, which will be kept in the metadata and used during the indexing (see the values of indexer.md.mapping in the configuration file). As of writing, Nutch does not have a generic plugin for extracting data with XPath but there is work in progress in NUTCH-1870, neither does it have an equivalent of the ContentFilter. The ContentFilter allows to restrict the main text of the document to the section covered by the XPath pattern given in the configuration. This is a very useful way of removing the boilerplate as many sites use specific tags for that purpose.
You may wonder why both configuration files for the URLFilters and ParseFilters are called tesco.*.json, the answer is simply that we declared these names to be used in the main config file :
parsefilters.config.file: "tesco.parsefilters.json"
urlfilters.config.file: "tesco.urlfilters.json"
You can of course chose the name of your choice. If these are omitted from the configuration file then the default files urlfilters.json and parsefilters.json inherited from the core storm-crawler modules will be used.
Compilation
Now that we have defined our topology class, the custom resources and the configuration file, the last element is the pom.xml file which allows us to compile the project with Apache Maven. This is done by simply executing ‘mvn clean install’ on the command line. This will download the dependencies, compile the code and get everything packaged for us in a neat jar file, resources included (BTW if you are feeling curious, why not have a look at the content of the file target/stormcrawler-tescobank-0.1-SNAPSHOT.jar?).
The pom file is very straightforward and declares the various modules (core, sql, etc...) that we need in our topology.
Running the crawl
We are almost good to go. The only remaining task is to add a seed to our MySQL table.
As you can see we are using a bespoke metadatum (isSitemap=true) which is used by the SitemapParserBolt.
We can now start the crawl with the following command :
`mvn exec:java -Dexec.mainClass=com.digitalpebble.stormcrawler.CrawlTopology -Dexec.args="-conf crawler-conf.yaml -local`
This will work even if you haven’t installed Storm, however if Storm is installed you can do the same with :
`storm jar target/stormcrawler-tescobank-0.1-SNAPSHOT.jar com.digitalpebble.stormcrawler.CrawlTopology -conf crawler-conf.yaml -local`
Removing the -local parameter will run the topology in deployed mode as we will see later on.
Unlike Nutch, StormCrawler runs continuously and the topology will not stop at the end of the crawl. You should be able to see when it has finished by looking at the logs on the console or by querying MySQL with :
select count(*) from tescobank where status='discovered';
The graph below comes from the monitoring section of the CloudSearch web UI and is a good illustration of how StormCrawler differs from Nutch. As you can see documents are continuously being added to the index instead of being processed by batch.
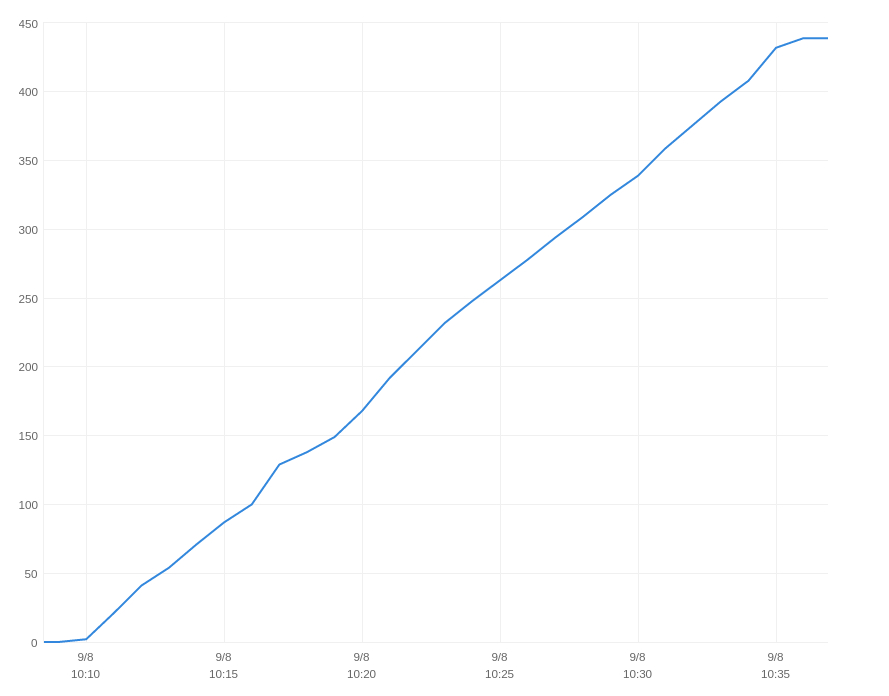 |
| Timeline of indexing with StormCrawler |
The whole process took roughly 26 minutes (vs 35 minutes for Nutch).
Going further
As explained above, you could set up a Storm cluster on your machine (see instructions on https://storm.apache.org/documentation/Setting-up-a-Storm-cluster.html) and launch the crawl in deployed mode by using the ‘storm’ command and removing the ‘-local’ option from the command line. This will submit the topology to the Storm cluster and return straight away.
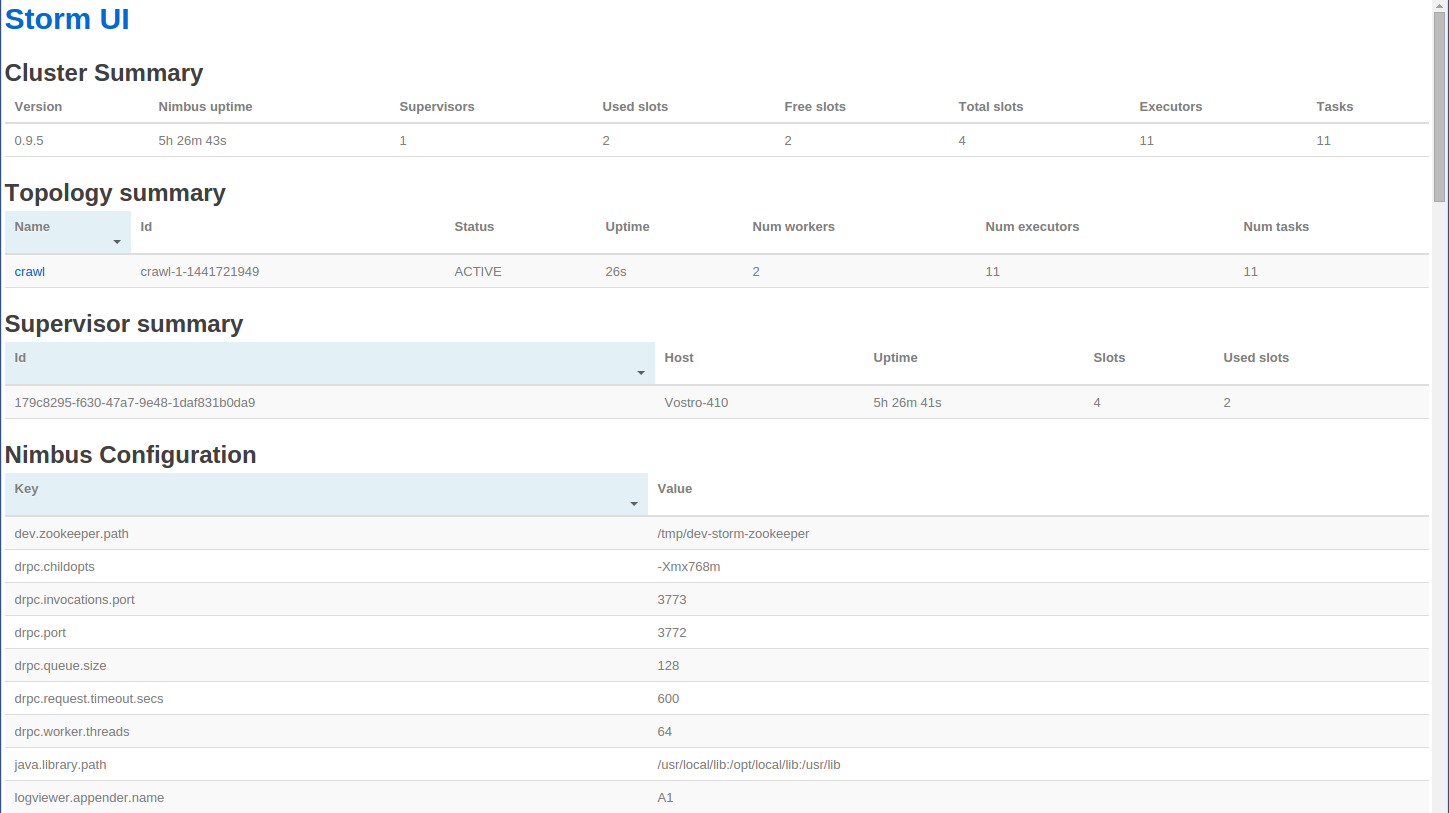 |
| Storm UI |
Clicking on the topology name takes you to the topology page.
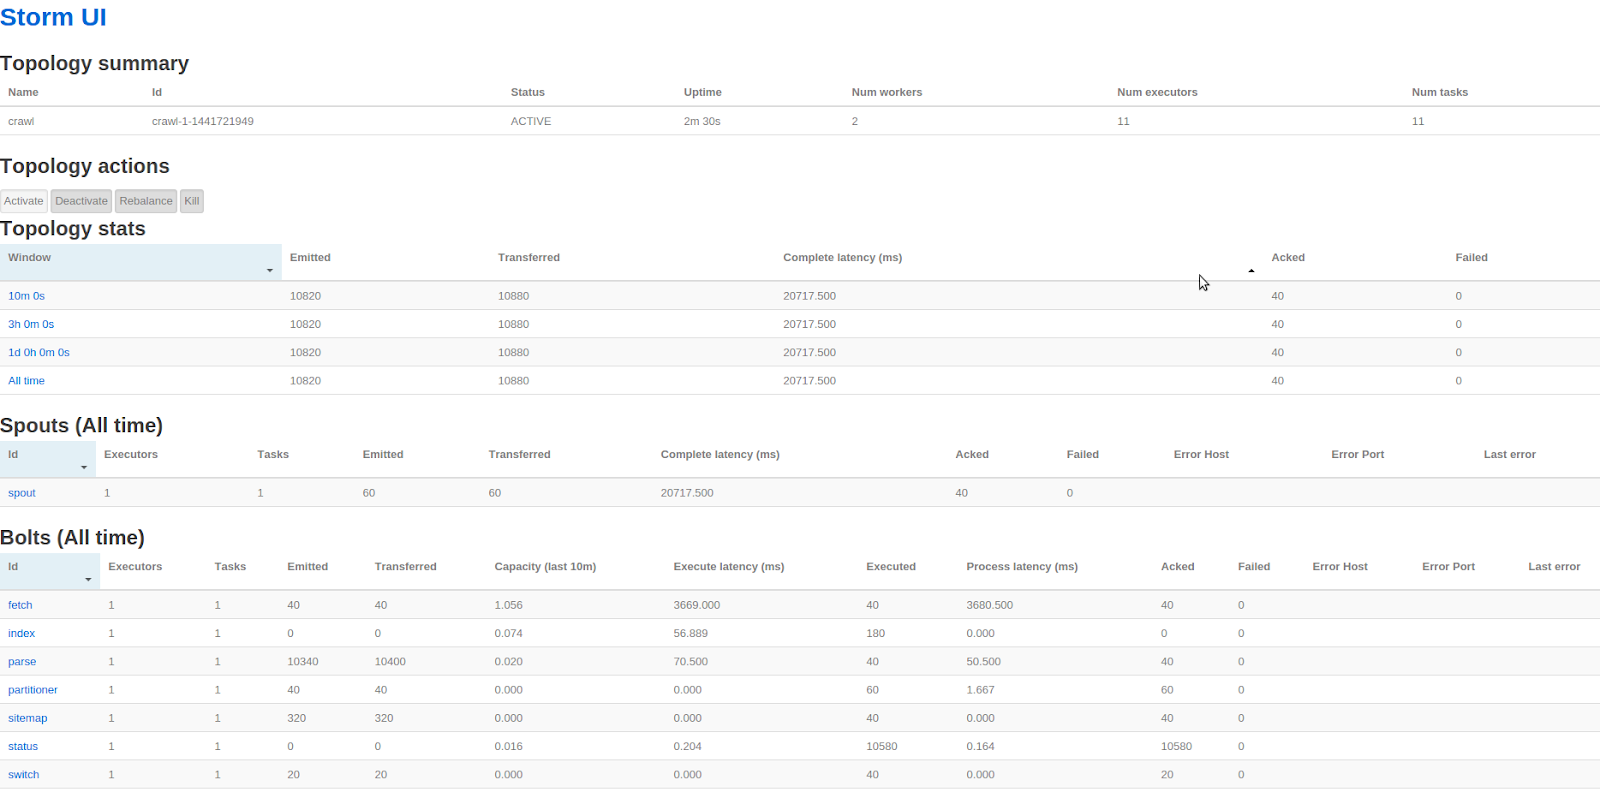 |
| Topology UI |
This page contains some very useful information about the performance of each component of the topology. As expected the fetch bolt takes most of the time (3.6 seconds on average per tuple), which, given that we specified a 2-second delay between HTTP requests, probably means that the actual fetching of a page takes on average 1.6 seconds.
Beside the Storm UI, we now have separate files for the logs (see worker-*.log files in the log directory of your Storm setup) and the metrics (see metrics.log). The latter was triggered by the use of the line
|
conf.registerMetricsConsumer(LoggingMetricsConsumer.class);
|
|
4:fetch fetcher_average {bytes_fetched=59436.0, fetch_time=1741.6666666666667}
4:fetch fetcher_average {bytes_fetched=60339.75, fetch_time=1872.25}
4:fetch fetcher_average {bytes_fetched=58915.5, fetch_time=1843.5}
4:fetch fetcher_average {bytes_fetched=58012.333333333336, fetch_time=2030.0}
which give us the average number of bytes and time spent retrieving the content over the sampling period. These figures tend to confirm our observation above that the fetch time itself takes a substantial amount of time.
One of the great features of Apache Storm is that the metrics mechanism is completely pluggable and users can implement backend for their favourite metrics system (like AWS CloudWatch for instance).
Conclusion : Sumo vs Ninja
Hopefully this tutorial helped you gain a better understanding of how to use Nutch or StormCrawler to index web pages into AWS CloudSearch, and also how these two projects differ.
Both tools have their advantages and slight drawbacks and it is a matter of determining which one is best suited for your particular use case. The one we chose for this tutorial was a very basic one and either tool can be configured further to extract more specific information. On the whole, StormCrawler is probably a bit more versatile and it can be used more easily than Nutch, for instance when dealing with URLs coming as a stream (e.g. generated by some user interaction). Doing it with Nutch would be doable but definitely less straightforward.
One of the main differences is that StormCrawler is a SDK : you need to take care of the storage yourself (although there are loads of resources already available that you can reuse), whereas Nutch 1.x does not need any external resources and leverages Hadoop's datastructures on HDFS.
Latency is also a key element in favour of StormCrawler. As we’ve seen above with the graphs showing when the documents were indexed in CloudSearch, the stream processing nature of StormCrawler is definitely easier than Nutch’s batch processed. Another example of how this can have an impact is when dealing with sites using sessions with a short TTL. With Nutch, you get little control as to when URLs actually get fetched.
Performance-wise, Storm probably has a more optimal utilisation of the hardware as it uses the network, disks and CPU all at the same time whereas Nutch is limited by the batches and for instance does not fetch when it is on another step (e.g. generating / parsing / updating or indexing). We can expect StormCrawler to be usually faster than Nutch but probably not by such a large margin as reported (26 vs 35 minutes), as Nutch could have been made a bit faster e.g. by parsing while fetching and removing the unnecessary link reversion step from the crawl script. I chose to keep those to make the tutorial as fluid as possible.
In terms of features both projects have their pros and cons. For instance Nutch can deduplicate documents (SC currently can’t) while StormCrawler uses the canonical tag when indexing. Nutch can handle deletions of gone pages whereas StormCrawler currently only adds content. As we’ve seen above, StormCrawler can handle sitemaps and filter based on robots directives, it also has better support for Xpath extraction, whereas Nutch will soon be getting a new web UI and rest endpoints, etc… It would be tedious to go into an exhaustive list of their differences, I will just mention two more, namely that Nutch can do continuous crawls as well as one-off ones, whereas StormCrawler runs exclusively in a continuous manner. Finally Nutch has been used and tested on an extremely large scale whereas with StormCrawler the scalability depends on what data backend you will use and needs more fine tuning than Nutch.
There are also more subjective ways in which to determine which of these two projects is the most suited to your use case : which one is easier to build, deploy and monitor? Which one is easier for beginners to understand? Which one would fit better in your overall architecture?
Nutch and StormCrawler also have a lot in common (including some of the committers like myself). Both are under Apache license and have active communities. Nutch certainly has a larger user base but StormCrawler is definitely gaining adoption. They also both use and contribute to libraries such as crawler-commons and as such benefit from each other's improvements. Many components and concepts in StormCrawler were initially taken from Nutch and conversely some improvements in StormCrawler got contributed back to Nutch.
I hope that you have found this tutorial useful and that we will soon count you amongst the regular users of Nutch and StormCrawler. Happy crawling!


